
Showing posts with label Crafts. Show all posts

Sunday, October 28, 2012

Halloween Party Ideas

WOW!  How do I ever begin to explain all that has been going on in my life for the past 3 months?!?  I was hoping to return to my blog much sooner than now, with ideas for back-to-school, fall, math and also get a jump on Halloween ideas.  Unfortunately, none of that happened before now.  Hopefully by now, if you are a room parent, you have already begun thinking of what games, crafts, snacks, activities or ideas you have in mind for your 1st classroom party of the school year...HALLOWEEN!  If you haven't yet thought of it, and you find yourself waking up in a cold sweat at night, here are a few tips and tricks to get you started.

1.  PLAN IT
Over the years, I have found the best system for younger aged kids to plan to run the party as centers or stations.  Break the students into small groups and have them rotate from one center to the next.  The smaller sized groups makes it easier for parent volunteers to manage and it helps the students by changing up the activities.  The best ideas for centers include age appropriate games, snacks, or crafts.  After rotating through the centers, it's best to end the party with a whole group game or activity or a fun book relating to the holiday.

2.  GET HELP!
Don't try to do everything yourself!  You will end up either stressed, broke, or at home at the end of the party crying into your diet Coke.  Ask for help!!!  Parents, grandparents, or close friends are all great resources.  Ask for help in a variety of ways...either by attending the party to assist or by donating goods to the party, especially for any working parents who can't attend.  Check with the teacher ahead of time to see if the school/classroom has any supplies you might need for the party.  Most likely, the teacher may be willing to donate glue, construction paper or other craft items.  Keep in mind, that you not only need to plan for craft and game supplies and snacks, but also for paper ware or any simple decorations.

3.  HAVE FUN!
 Even though you can guarantee things WILL get chaotic and loud during the party, enjoy it!  The kids should have a fun time no matter what they are doing...even if things don't go according to plan, which sometimes happens!  One thing to think of is taking pictures.  I know that I take pictures of my class during the holiday parties so that I can add them to my end of the year DVD.  If that's something a teacher doesn't do, you may want to assign a parent to be in charge of this assignment.

Classroom Party Guide from Volunteer Spot

And finally...here are a few Halloween ideas to get things rolling...

CRAFTS:
 
Halloween Mason Jar Lantern - I would think this fun craft idea would be ideal for 3rd graders or older.
 
Scary/cute spider hat from Little Buggie Tutu
 
GAMES:
 
7 Halloween party games and activity ideas from Volunteer Spot.
 
Copy and laminate this monster chart from Expressive Monkey to have students draw their own monster masterpieces.
 
Don't Eat Frank game board from My Sister's Suitcase.
 
SNACKS:
 
Skeletons made with brownies, white chocolate covered pretzels and marshmallows (drawn on with edible marker) from Wants and Wishes.

Crispy Frankenstein Treats from Grumpy's Honeybunch.
 
Candy Corn Halloween Bark from The Girl Who Ate Everything.
 
Witches hat made from frosted sugar cone, sprinkles, gummy worms and cookie or cupcake liner as suggested. 
(Source:  No Time for Flash Cards)


Tuesday, February 28, 2012

Cat In the Hat Day at School

Even though our school didn't celebrate the book The Cat in the Hat today, my class sure did!  As I mentioned before, our school has a teacher reader exchange.  Basically every teacher in the school (principal included) chooses a book to read to a group of 25 kids.  The book can be a Dr. Seuss book, but doesn't have to be.  The day before the exchange, the teachers take their students around the halls to sign up for a book to have read to them by another teacher.  The sign ups are posted either on the teacher's door or in the hall next to their room. 
Most teachers also include a photocopy of the book so the younger kids actually know what they're signing up for. :)  On the day of the swap, the teachers are to read the chosen book and possibly do an activity to fill up the 20 minutes.  This can be somewhat challenging considering we are entertaining a group of students varying in ages from kindergarten - 6th grade, but regardless it is always fun.
Last year I read the story Stand Tall Molly Lou Melon and passed out fun sized (waterMELON flavored) Laffy Taffy candies.  I felt these went well with the story because of the MELON part, but also in this book the grandmother tells Molly Lou Melon to "Smile big and the world will smile right alongside you."  And as we know, jokes (like the ones on Laffy Taffy) make everyone smile!
This year I decided to read a book I think is great fun too...Diary of a Worm.  Seriously makes me laugh!  I thought about giving out gummy worms or doing some activity to tie it together with the book, but ultimately I went with a Dr. Seuss idea.  We made these Cat in the Hat snacks (as suggested on my prior post).
The kids really enjoyed making them, but loved eating them even more!  I had to of course make them with my own students when  they returned to class!
The other part of this Cat in the Hat day came when one of the teachers on my team offered to let me borrow her how-to draw the Cat in the Hat DVD.  I'm not really sure where the DVD came from to refer it to you, but if you would like to teach your kiddos how to draw the cat too, I did come across this step-by-step tutorial you could follow from Fairy Dust Teaching.  What you'll need to complete this art project is:  white card stock or (12 x 18) construction paper, like what we used, and red & black markers (Sharpies).  And the result will be something a little like these cute buggers my firsties created.


They were so proud of their work, and they had great reason to be!  Aren't they the cutest things ever!?!
The last thing we did was to add a Cats In Hats poem to our poetry notebooks.
As always, we read the poem as a class and looked for rhyming words to highlight.  I try to add a poem a week to these notebooks, most of which I got from Just 4 Teachers to go along with our reading program Treasures.  Every once in a while I throw in a poem that goes along with something else we are studying, holidays, etc.  Pair the poem with a Cat in the Hat coloring page and we were set.

Hope your Dr. Seuss week is going well so far! 

Thursday, February 23, 2012

Cat In The Hat Ideas

After reading The Cat in the Hat next week...because you know you will have to, here are a few clever findings that maybe you can add to your hectic week!
Unfortunately, I saw this idea on Pinterest without a link.  If  you know where it is from, please let me know, otherwise use the picture to figure out how to make this little creation. 
*Update:  The creator of this noodle craft is Sarah Butler (found through Pinterest), but again no link to her blog.  Instead I am linking to her Pinterest.
If you have a couple of empty TP tubes sitting around just waiting to be used on a project, then look no further.  Visit Stuff By Ash to find the templates needed to complete this.
Cat in the Hat art project from Mrs. Karen's Preschool Ideas.
 Here's the same concept, but a different template....using a paper plate and shapes.  This idea comes from Teaching Two.
Need a snack after reading? 
Artisan Cake Company offers this parfait idea using red jello and whipped cream.  Looks delicious!
Or why not recreate the cat using graham crackers, Nilla Wafers, pull apart licorice, white frosting, and mini (baking) M&M's like Oxford Elementary did?  FYI I am totally using this snack idea next week when my school does a teacher reader exchange!

Sunday, February 12, 2012

Valentine Card Boxes

This year I only have one Valentine card box to complete.  My son says he would like another I-pod box like the one I made when he was in 3rd grade.  We'll see...
If you are trying to come up with an idea, here are a couple of ideas I have come across.
From Danielle's Place, you can recreate your own Valentine love bug out of a milk jug.
Using a graham cracker box (or another box similar in shape and size), create a penguin like found on Crafts N' Things.
Maybe you're looking for something a little more simple?  If that's the case, here's an idea for making a suitcase looking card holder from Plaid Online.
If you have a child who is really into sports, maybe one of these ideas will do the trick for you...
A basketball box from Scrap Happens.
or this football one from PTIT Chef.  I would of course have to find a way to turn it into a Denver Broncos theme though!
In my classroom, we make jumbo card envelopes.  I take about a 18" x 24" piece of tag board and fold it in half so that when finished it measures 18" x 12".  After punching holes in the sides, the kids have to sew the sides and then decorate their envelope with die cut flowers or hearts I have punched out or draw things they love on it.  I will have to snap a picture of one when I go to school tomorrow so you can get the visual more clearly.
So how do you do things in your classroom?  Do you assign it to be an at home project or is it something you put together in class?  I'd love to know.

Wednesday, February 8, 2012

Valentine Party Ideas

With Valentine's Day just around the corner, if you are currently a room parent or in charge of a party, you may be going into panic mode.  Hopefully a few of the following ideas will ease some stress.
How about a new rendition of pin the tail on the donkey?  Try "pin the lips on the teacher"!!  The Teacher's Wife has a FREE lips pattern you could even use.  Just print it out and have the students color and write their names on the lips!
Mom On Time Out shows you exactly how to create Hershey Kiss Roses.  I think these would be fun for kids to make and take home to their moms as a surprise.  You could even give a bouquet of these to your teacher, friends, etc.
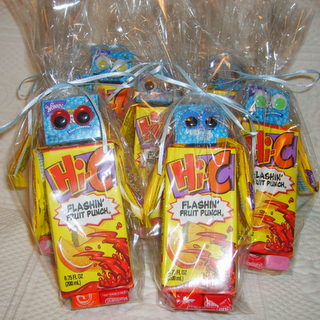
Check out these super cute (Valentine) robots made from a juice box.
Source:  Gifts That Say Wow!
How about making some Love Bugs from The Decorated Cookie.
Speaking of Love Bugs...how about a Love Bug hat to go along with the {above} treat?
Source:  Glue Dots
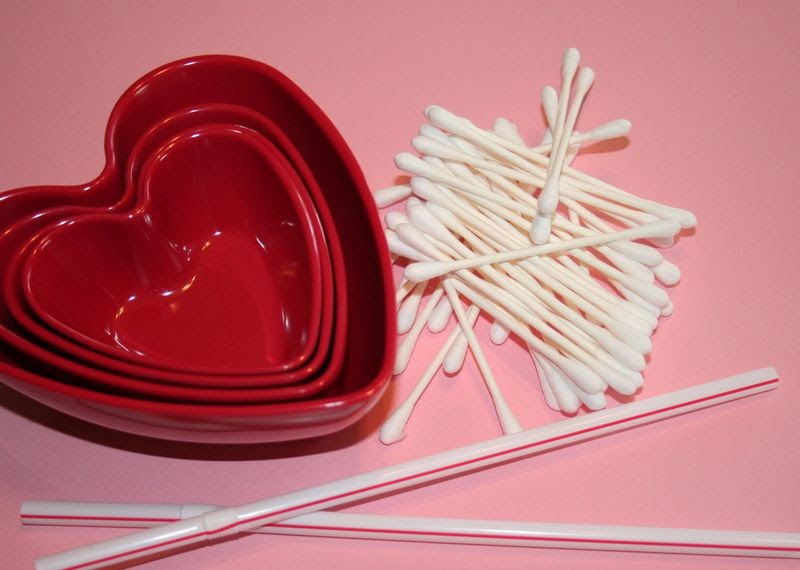
Need a game?  Here is one from It Matters called Cupid's Arrow. 
Basically what you do is you set {heart shaped if you have them} bowls across the room and place some tape on the floor so the kids will know where to stand.    The kids then load their "arrows" (straws) with a Q-tip one at a time and blow them out, aiming for the bowl across the room.  The team or person with the most Q-tips in the bowl at the end of the time is the winner!
And finally, from Mrs. Schmelzer's First Grade, she has a fabulous post about some ideas that came from her Valentine's class party.  I'm talking a Minute to Win It game, Heart Lava, and another called Broken Heart.  If you still haven't found an idea that interests you from my above suggestions, you need to check out these party ideas.  I think not only does the name "heart lava" sound cute, but so does the game!

Wednesday, February 1, 2012

DIY Valentine Count Down

February 1st already?!?  Where does the time go?  I have come across so many great Valentine's ideas lately so I thought now would be great to begin posting some of my finds.  But first, to get things rolling, here is a DIY Valentine's Day count down from I Love It All with Monica Wright.

Thursday, January 26, 2012

100th Day of School

If you are an elementary teacher, primarily grades K-2, you know just how important the 100th day of school is!  In my classroom we keep track on a 100's chart how many days we have been in school, including adding a popsicle stick to the ones pocket and then bundling at each 10.  Trust me, my kids KNOW when the 100th day of school is!!  That crazy day just happened to fall yesterday and can I just say how sad I am.  The reason you ask?  I thought I was totally prepared with my camera for some good pictures for our class end of the year video, but in truth my camera's memory stick was not in my camera and would not work for me. :(  Here are 2 pictures that I snapped today of projects that were left in the classroom...
One project was to make a classbook of what the kids would buy if they had $100.  Some of the answers included a horse, a limousine, a truck, and a fancy place to live, but this student must be thinking more of the future!
 We made these hats (which now I can't remember where they were found.  Let me know if you know.)
 The headband was a strip of 2 x 18 construction paper.  Before stapling the hat together, the kids had to write to 100 using tally marks.  Surprisingly, they thought it was really fun math!
If you are in need of a hat design, here is a link to a 100th day of school crown from The Virtual Vine.

Ok so this is where you use your imagination to visualize the other activities.  For a snack, I surprised the kids when they came back in from recess with a "100" on their desks made from a wafer cookie and 2 donut holes. 
We also played this math game from Making Learning Fun.  I shrunk the 2 pages down so they fit side by side on one paper and had the kids play the game in partners.  (Click the link above for directions on how to play.)
The kids were each asked to bring in 100 items that fit inside of a paper lunch sack I provided.  On the front of the bag I had stapled a paper explaining what were doing, but basically the kids were to write 3 clues of what was in the sack so we could guess.  Once everyone had a turn, we shared all the items so the kids could take home a piece of everyone's collection.  I think this was my students' favorite activity!  Yesterday was such a fun day, and one that my students had been looking forward to for...well...100 days!

If the 100th day of school is equally important to you or your students, here are a few ideas I have come across:
* Make a classbook using one of the following ideas: 
I would like to have 100 _________ , but I would not like to have 100 __________ .
If I had $100, I would buy ___________ .
In 100 days of school, I have learned how to __________ .
* Have the students fill out a blank 100's chart...good assessment tool too!
* Do 100 math problems.
* Have the students make posters using 100 items.  Here are a few I came across...
100 sugar cubes makes an igloo.

100 gumballs

OR you could use this FREE gumball printable from Plum Adorable.

100 Flowers (Idea from Circle of Quiet)

Here's an easy one you could put together at the last minute...10 hand prints!

Looking for a super cute bulletin art project?  This one was put together by Mrs. Williamson in Room 36.

Still need more ideas?  Check out my 100th Day of School board on Pinterest.  Hope you have a happy and hectic 100th day of school too!

Sunday, January 15, 2012

January Bulletin Board

Even though January is half way through, you can still use this idea for a few more weeks, or store it away for next year.  One thing about me, is that I love scrapbooking, being crafty and doing art (with my students), but changing out the bulletin board may be one of my LEAST  favorite parts of teaching.  I love looking at what others do in class and display on their bulletin boards, but with everything else there is to do as a teacher, I feel it falls to the back burner sometimes.  So, with that in mind, I like to keep the ideas simple and preferably last for a month or longer.  In fact, if you look at the background for my bulletin boards, you may even notice to same butcher paper ALL YEAR LONG! lol  At least I am saving paper right!?!
I actually saw this art idea on where else, but Pinterest!  (The idea came from Oopsey Daisy.)  When I saw it, I knew I wanted to try it! 

First we read the book Snowmen At Night by Mark Buehner (great book by the way!)  I had a parent volunteer in class that day to help, so I decided it would be a perfect day for a potentially messy art project.  After reading the story, I called about 5 students over to my kidney table at a time to make their snowmen.  The other students stayed at their seats cutting their "extras" out, such as scarf, carrot nose, etc. out of scrap paper.  Truthfully, had I had any scrap fabric on hand at the time, we would have used that for the scarfs.  The kids didn't seem to notice or mind though.  I had my parent volunteer walk around the students to ask what their snowman did at night.  She then wrote their responses on a post it note so they could copy it onto their already printed out paper.  (Their paper said:  "My snowman _____________ at night.") 
I must say that I enjoyed this activity and can see myself using it again in the future, however the next time around I would like to involve more writing.  I think that by mid-year my students could have written a story to go along with their snowman, but like I said that will have to wait until next year. 
The snowmen were created by mixing approximately equal parts of shaving cream to Elmer's glue.  The students painted their snowman with their choice of a popsicle stick or their fingers onto a 8 x 8 piece of blue construction paper.  Before their snowman dried, they attached googly eyes, carrot nose and anything else they wanted to add.  Once the snowmen were dried, we backed them with a 8 1/2 x 8 1/2 sheet of white cardstock for more support.  I couldn't believe how soft and fluffy looking the snowmen dried!  The hardest part has been keeping the students from touching their masterpieces as they have been on display in the hall!  The kids were definitely proud of their projects!
Here are a few up close shots:

"My snowman delivers presents at night."
"My snowman goes sledding at night."

"My snowman feeds my horse at night."

Friday, December 23, 2011

DIY Wooden Christmas Presents

Christmas Idea #22 - DIY Wooden Christmas Presents

I am really liking these presents made from blocks of wood and scrapbook paper.  All you would need to do is Modge Podge scrapbook paper cut to size (edges inked if you you like that look...I do!) and tie some ribbon or tulle into a bow on top.  Simple decoration for your home or to give to someone as a gift.
Source:  Spotted Canary
Speaking of crafts, I saw this JUMBO JOY sign on Pinterest (without a link) and love the way it looks.  Simple and cute.  I'm not sure I would want to store something as big as that for the other 11 months of the year.  Maybe a small version would work instead.