Monday, January 30, 2012

Tacky the Penguin Sequencing Activity

Since coming back from Christmas break, my class has been learning about penguins and other arctic animals.  We just finished up this unit, but before it came to a close I thought I would complete my 2nd lesson for my yearly principal evaluation.  I decided to tie in what we have been learning about in our reading program (sequencing) to what we have been learning about in class (penguins), and thus Lesson 2 (Literacy) was created.
When learning about penguins we read both fiction and nonfiction books and so of course I had to throw Tacky the Penguin somewhere into the mix!  I saw this anchor chart from Life in First Grade and decided to change it to the story we read, which of course was Tacky the Penguin.
I premade the anchor chart with everything you see above, except for the blue writing of first, next, then and last.  That part we did as a class after discussing elements of the story.  I gave each student 4 index cards and we began to break apart the story.  We talked about what happened first in the story and came up with the important thing being that Tacky was an odd bird.  The students wrote that on index card #1.  Next we discussed what happened next or secondly in the story and wrote that on index card #2 and so on until all 4 index cards were filled up.  The students then went back to their seats and were each given a 12 x 18 sheet of construction paper and told to fold it in half "hotdog" way.  They wrote the title of the book on the front along with their name.
 When the students opened their paper, they were to glue their 4 index cards down on the left side in order or events.  Then they were given 4 more index cards to draw a picture to match up with the event described in the story.  The kids had fun with this activity and I thought it was a fun twist on learning more on sequencing.

Friday, January 27, 2012

Fun with Geometry

What a CrAzY week month it has been so far!  (Notice the lack of posts!)  This week along with the 100th day of school, I had my yearly principal evaluation.  My principal said he wanted to sit in on 2 - 30 minute lessons, one for math and one for literacy.  I always try to throw some kind of integrated activity into the mix, whether it be math with art, writing with art, writing with math, etc.  You get the idea.  Anyway, I thought I would share with you what it was I chose to do.
Lesson 1 (Math)
In the chapter of math, which we just finished, we have been learning about 2-D and 3-D shapes so I wanted to do a lesson that would reinforce what we have been learning about.  To start out, I read the story The Greedy Triangle. 
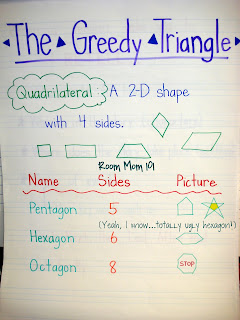
In case you are unfamiliar with this story, it's about a triangle who becomes dissatisfied with his shape and asks to be transformed into another shape.  He goes from being a triangle to a quadrilateral, from quadrilateral to pentagon, from pentagon to hexagon and so on until he becomes a decagon (10 sided figure).  Eventually he realizes that he was most happy being himself, the triangle.  Because I knew that some of the words would be unfamiliar to my students, I made this anchor chart to look at before reading the story. 
We discussed how a quadrilateral is any 2-D shape with 4 sides and drew a few as examples.
After reading the story I told the kids that I was going to give them about 10 minutes to create a snowflake using only the 5 die cut shapes provided.  They could use a triangle, hexagon, square, rhombus (a fancy word for diamond), and a trapezoid to complete their snowflakes.  (I found the idea on A Place Called Kindergarten).  I told them they had to be as unique about aking their snowflakes as real snowflakes are and that they needed to fill up the whole 8 x 8 blue construction paper square.  The kids did a great job at not only creating their snowflakes, but also being UNIQUE! 


Once they completed their snowflakes, I gave each student a chart where they filled out how many of each shape they used.  We then graphed the shapes used by the class to determine which shape was used the most and which one was used the least.  The kids had fun with this activity and it was a good variation from using only the math book all the time!!
Here are a few more shapes ideas which could be used for a math lesson:
3-D shape poem from Lil' Country Kindergarten
Why not teach your studnets about 3-D shapes but taking a snack break! 
Idea from Busy Bees
Mrs. Plant's Press also had some super ideas for teaching her kindergarteners about 3-D shapes!  She also suggested using food to teach, but I love her anchor chart!
Make a shape collage like the one found at Miss Renee's Kindergarten Pad.

FREE shape poems from TpT!  Thanks Skipper's Jungle!
A shape flip book foldable by Kindergarten Crayons.

Thursday, January 26, 2012

100th Day of School

If you are an elementary teacher, primarily grades K-2, you know just how important the 100th day of school is!  In my classroom we keep track on a 100's chart how many days we have been in school, including adding a popsicle stick to the ones pocket and then bundling at each 10.  Trust me, my kids KNOW when the 100th day of school is!!  That crazy day just happened to fall yesterday and can I just say how sad I am.  The reason you ask?  I thought I was totally prepared with my camera for some good pictures for our class end of the year video, but in truth my camera's memory stick was not in my camera and would not work for me. :(  Here are 2 pictures that I snapped today of projects that were left in the classroom...
One project was to make a classbook of what the kids would buy if they had $100.  Some of the answers included a horse, a limousine, a truck, and a fancy place to live, but this student must be thinking more of the future!
 We made these hats (which now I can't remember where they were found.  Let me know if you know.)
 The headband was a strip of 2 x 18 construction paper.  Before stapling the hat together, the kids had to write to 100 using tally marks.  Surprisingly, they thought it was really fun math!
If you are in need of a hat design, here is a link to a 100th day of school crown from The Virtual Vine.

Ok so this is where you use your imagination to visualize the other activities.  For a snack, I surprised the kids when they came back in from recess with a "100" on their desks made from a wafer cookie and 2 donut holes. 
We also played this math game from Making Learning Fun.  I shrunk the 2 pages down so they fit side by side on one paper and had the kids play the game in partners.  (Click the link above for directions on how to play.)
The kids were each asked to bring in 100 items that fit inside of a paper lunch sack I provided.  On the front of the bag I had stapled a paper explaining what were doing, but basically the kids were to write 3 clues of what was in the sack so we could guess.  Once everyone had a turn, we shared all the items so the kids could take home a piece of everyone's collection.  I think this was my students' favorite activity!  Yesterday was such a fun day, and one that my students had been looking forward to for...well...100 days!

If the 100th day of school is equally important to you or your students, here are a few ideas I have come across:
* Make a classbook using one of the following ideas: 
I would like to have 100 _________ , but I would not like to have 100 __________ .
If I had $100, I would buy ___________ .
In 100 days of school, I have learned how to __________ .
* Have the students fill out a blank 100's chart...good assessment tool too!
* Do 100 math problems.
* Have the students make posters using 100 items.  Here are a few I came across...
100 sugar cubes makes an igloo.

100 gumballs

OR you could use this FREE gumball printable from Plum Adorable.

100 Flowers (Idea from Circle of Quiet)

Here's an easy one you could put together at the last minute...10 hand prints!

Looking for a super cute bulletin art project?  This one was put together by Mrs. Williamson in Room 36.

Still need more ideas?  Check out my 100th Day of School board on Pinterest.  Hope you have a happy and hectic 100th day of school too!

Sunday, January 15, 2012

January Bulletin Board

Even though January is half way through, you can still use this idea for a few more weeks, or store it away for next year.  One thing about me, is that I love scrapbooking, being crafty and doing art (with my students), but changing out the bulletin board may be one of my LEAST  favorite parts of teaching.  I love looking at what others do in class and display on their bulletin boards, but with everything else there is to do as a teacher, I feel it falls to the back burner sometimes.  So, with that in mind, I like to keep the ideas simple and preferably last for a month or longer.  In fact, if you look at the background for my bulletin boards, you may even notice to same butcher paper ALL YEAR LONG! lol  At least I am saving paper right!?!
I actually saw this art idea on where else, but Pinterest!  (The idea came from Oopsey Daisy.)  When I saw it, I knew I wanted to try it! 

First we read the book Snowmen At Night by Mark Buehner (great book by the way!)  I had a parent volunteer in class that day to help, so I decided it would be a perfect day for a potentially messy art project.  After reading the story, I called about 5 students over to my kidney table at a time to make their snowmen.  The other students stayed at their seats cutting their "extras" out, such as scarf, carrot nose, etc. out of scrap paper.  Truthfully, had I had any scrap fabric on hand at the time, we would have used that for the scarfs.  The kids didn't seem to notice or mind though.  I had my parent volunteer walk around the students to ask what their snowman did at night.  She then wrote their responses on a post it note so they could copy it onto their already printed out paper.  (Their paper said:  "My snowman _____________ at night.") 
I must say that I enjoyed this activity and can see myself using it again in the future, however the next time around I would like to involve more writing.  I think that by mid-year my students could have written a story to go along with their snowman, but like I said that will have to wait until next year. 
The snowmen were created by mixing approximately equal parts of shaving cream to Elmer's glue.  The students painted their snowman with their choice of a popsicle stick or their fingers onto a 8 x 8 piece of blue construction paper.  Before their snowman dried, they attached googly eyes, carrot nose and anything else they wanted to add.  Once the snowmen were dried, we backed them with a 8 1/2 x 8 1/2 sheet of white cardstock for more support.  I couldn't believe how soft and fluffy looking the snowmen dried!  The hardest part has been keeping the students from touching their masterpieces as they have been on display in the hall!  The kids were definitely proud of their projects!
Here are a few up close shots:

"My snowman delivers presents at night."
"My snowman goes sledding at night."

"My snowman feeds my horse at night."